I went years not knowing my actual curl type. I’d watch hair tutorials on YouTube, buy the products the girlies swore by, follow the routines step-for-step — and end up with hair that looked nothing like theirs. It wasn’t the products. It wasn’t me being broken. I was just using a 3A routine on 3B/3C hair and wondering why nothing was clicking.
Knowing your curl type is one of those tiny pieces of self-knowledge that quietly changes everything. Once you know what you’re working with, every product, every technique, every TikTok hair hack starts making sense — because you finally know which advice is for you and which one to scroll right past.
So today, we’re figuring it out. Step by step. No gatekeeping.
First, Let’s Clear A Few Things Up
Before we get into the test, let me set the record straight on a few things, because the curl world has opinions and not all of them are useful.
Curl types aren’t a ranking. 3C isn’t “better” than 4B. 2A isn’t “easier” than 3A. They’re just descriptions of your coil pattern — like eye color. There’s no winning curl type, only the one growing out of your beautiful head.
You probably have more than one curl type. Most of us do. I’m a 3B/3C blend with some 3A pieces around my face when the humidity’s playing nice. Your crown might curl tighter than your nape. Your hairline might be looser than the rest. That’s normal, that’s gorgeous, that’s just hair.
Damage hides your real pattern. If your hair has been heat-styled, color-treated, or chemically processed, your “natural” curl pattern might be in witness protection. The test below works best on relatively healthy hair, but even damaged hair will give you clues about what’s underneath.
Okay. Now we test.
The 5-Step Find Your Curl Type Method
You’ll need: clean hair, no judgment, and about a day of patience.
Step 1: Wash with a clarifying shampoo
Product buildup, hard water minerals, dry shampoo from last Tuesday — all of it weighs your curls down and disguises their true shape. Start with a clarifying wash so you can see your hair, not your hair plus residue. One wash is enough.
Step 2: Apply minimal product (or none at all)
This is the part everyone gets wrong. To see your actual pattern, you need to see your hair doing its own thing. Please apply nothing, or apply only a small amount of leave-in conditioner—no gel, no mousse, no curl cream. Products encourage curl, which is great for styling but bad for diagnosing.
Step 3: Air dry. Fully.
I know. I know. But you cannot diffuse, blow-dry, or plop your way to an accurate read. Let it air dry undisturbed. Don’t touch it. Don’t fluff it. Let your hair tell you who it is without your interference.
Step 4: Look at a single curl in good lighting
Pick a piece — ideally from the back or middle, not the hairline (which often curls differently). Pull it gently straight, then let go. Watch what it does. The shape it takes is the data we’re working with.
Step 5: Match it to the chart below
Now we figure out what you’re looking at.
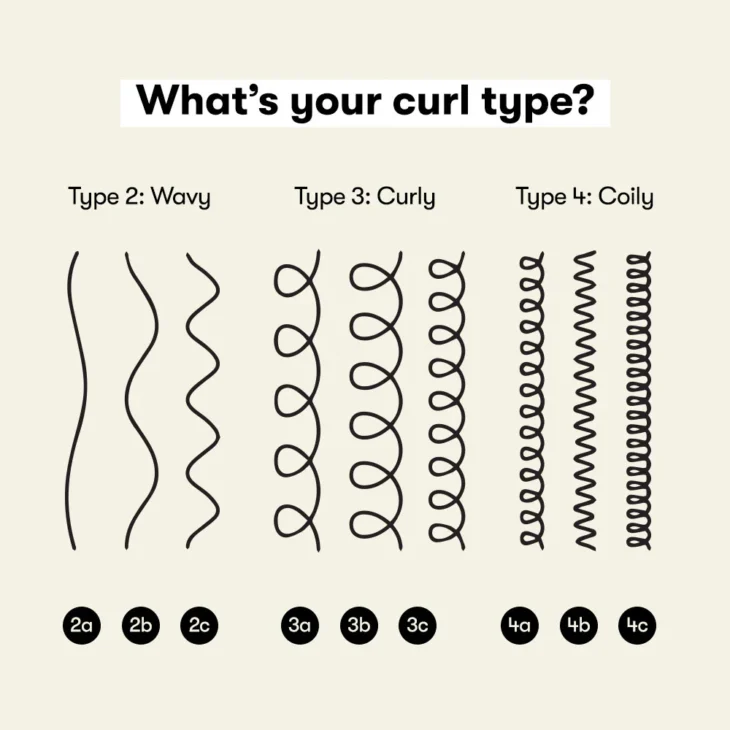
The Curl Type Cheat Sheet
The curl typing system most of the internet uses is the Andre Walker system — four main types, with letter subcategories for the looser-to-tighter range within each type.
Type 1: Straight
If your hair dries pin-straight with no bend, no wave, no S-shape — congratulations, love, you’re Type 1. You’re also probably not reading this post, but if you are: hi.
Type 2: Wavy
Type 2 hair forms loose, S-shaped waves. Think “beachy” rather than “ringlet.”
- 2A — Loose, fine, barely-there waves. Mostly straight at the roots, with a gentle S toward the ends.
- 2B — More defined S-waves starting closer to the mid-length. A little frizz-prone, especially in humidity.
- 2C — Strong, defined waves with the occasional rogue ringlet sneaking in. The borderline between wavy and curly.
Type 3: Curly
Type 3 is where the springs start. Defined coils that bounce back when stretched. (Hi, this is me.)
- 3A — Big, loose curls about the size of a piece of sidewalk chalk. Bouncy, shiny when healthy, well-defined.
- 3B — Springy ringlets about the diameter of a Sharpie. More volume, more density, more attitude.
- 3C — Tight corkscrew curls about the size of a pencil or smaller. Dense, voluminous, prone to dryness because the natural oils have a long way to travel down the coil.
Type 4: Coily / Kinky
Type 4 hair has the tightest pattern — coils that range from defined springs to a Z-shaped pattern that looks more like sharp angles than curves.
- 4A — Tight, defined coils about the circumference of a crochet needle. Visible S-pattern when stretched.
- 4B — A Z-shaped pattern instead of a curl. Sharp angles, less defined, dense. Massive shrinkage (your hair can look way shorter than it actually is).
- 4C — The tightest pattern, often with very little visible curl definition unless defined with product. Maximum shrinkage, maximum density, maximum fragile — handle with so much love.
A Little Quick-Match Guide
If you want the speed-run version:
- Hair dries straight → Type 1
- Hair dries with an S-wave → Type 2 (loose to tight: A, B, C)
- Hair dries in a coiled spring shape → Type 3 (chalk-sized to pencil-sized: A, B, C)
- Hair dries in tight coils or a Z-pattern → Type 4 (defined to barely-defined: A, B, C)
Pull a curl, let it bounce back, and ask: is it a wave, a spring, or a tight coil? That’s your starting point.
What If You’re In Between?
You probably are, sunshine. Most of us are. If your hair looks like 3A in some places and 3B in others, you’re a 3A/3B. Mine is a full 3B with 3C in the back, where it’s denser, and the front pieces sometimes act as 3A when the moon is right. This isn’t a flaw — it’s the whole story of your head.
When you’re shopping for products or looking up routines, default to the tighter of your two types. Tighter curls need more moisture and gentler handling, so erring on the side of caution keeps you safe. You can always loosen up the routine; you can’t undo over-styling.
Now What?
Knowing your curl type is the key. Walking through it is where the actual magic happens — the products, the routine, the technique, the protective habits that keep your pattern healthy and defined over the long term.
That’s the next post in this series. I’m breaking down how to actually take care of each curl type — the right cleansing schedule, the products that work, the techniques that don’t waste your time, and the mistakes that quietly destroy your pattern. One post per type, no fluff, all the things I wish someone had told me when I started my curl journey.
For now, do the test. Take a picture of your hair after step 3. Save it as your “before.” This is day one of knowing what you’re working with — and once you know, you can’t un-know.
Welcome to the club, babes.
xx, Nai